Deploy your containerized app to Azure App Service with Jenkins and Azure CLI - Part 3


In this tutorial you will learn to dockerize a sample NodeJS application and deploy the same to Azure Web App, with the Azure CLI in a Jenkins Pipeline.
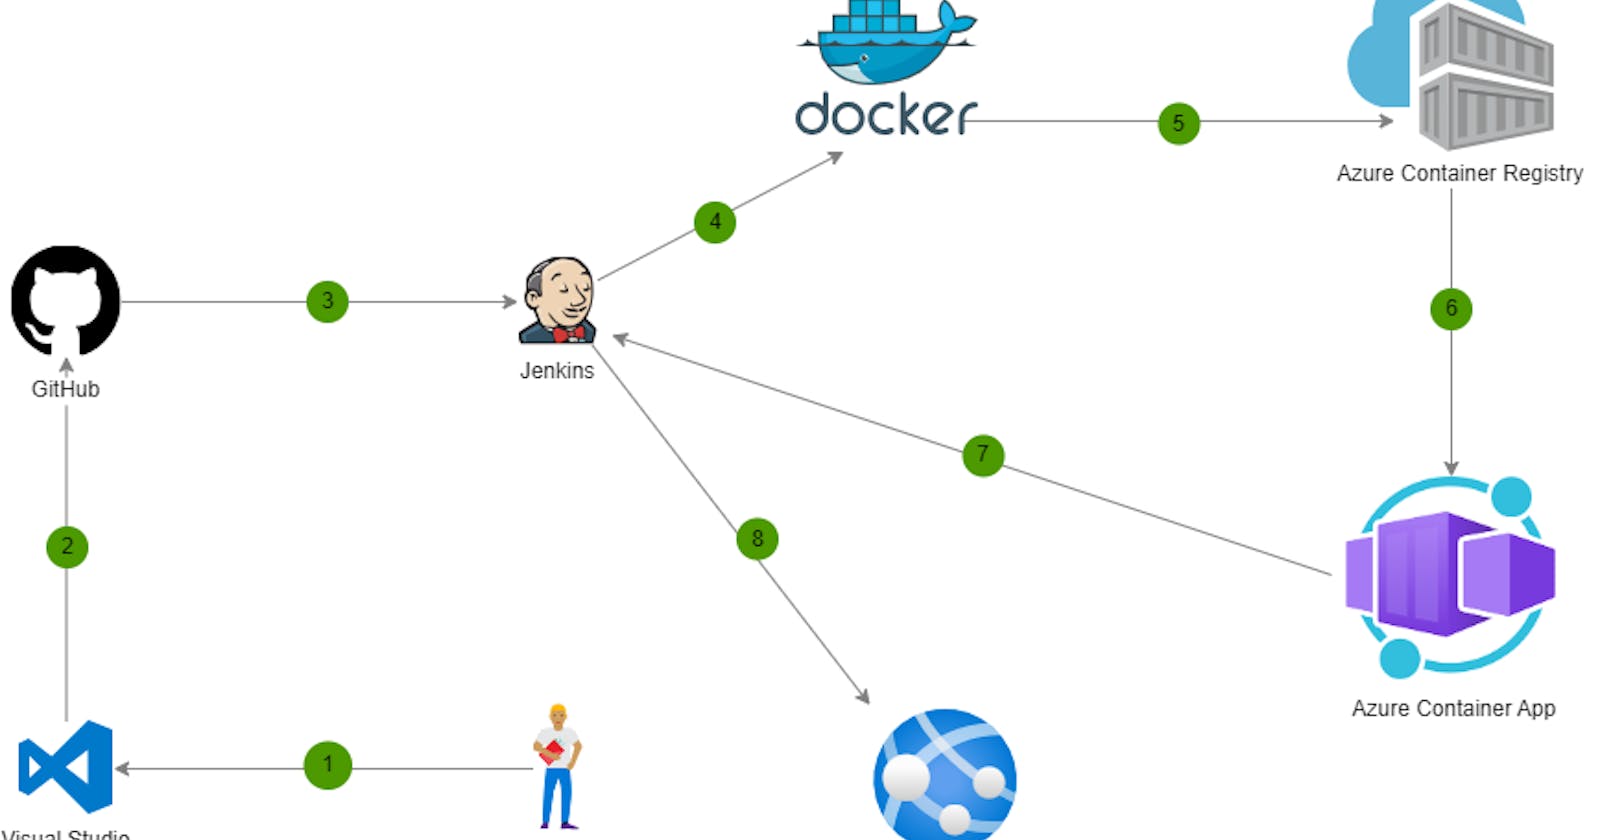
Here are quick steps that we shall follow:
Create a Jenkins Linux VM Part 1
Install Docker Engine on the Azure VM that is running Jenkins Part 2
Create an Azure Service Principal
Create an Azure container registry
Create a Web App in Azure
Configure Jenkins to manage your Credentials
Create your Jenkins pipeline
Run the Build manually to Deploy the new image build to your Azure Web App
Prepare your GitHub repository with the App Code
Create the new Automated CI-CD Jenkins pipeline to automatically execute the Build and Deploy tasks
Run the pipeline and verify the Web App is updated with the latest image build
Prerequisites
Azure subscription: If you don't have an Azure subscription, create a free account before you begin.
Jenkins - Install Jenkins on a Linux VM
Azure CLI: Install Azure CLI (version 2.0.67 or higher) on the Jenkins server.
Sample Application Code can be found at my Github Repository HERE
Create an Azure Service Principal
Automated tools like Jenkins, Terraform and others that use Azure services should always have restricted permissions to ensure that Azure resources are secure. In view of the above we will be following the principle of least privilege by using Azure service principals. An Azure service principal is an identity created for use with applications, hosted services, and automated tools. This identity will be used to access Azure resources.
Let us now create a service principal 'myappspn1' with the Contributor role and scoped to my Tenant Subscription (replace the Subscription ID with your Azure Tenant Subscription)
az ad sp create-for-rbac --name myappspn1 --role contributor --scopes /subscriptions/<replace_your_subscriptionID_here>
Output console should look like this:

      {
        "appId": "myAppId",
        "displayName": "myServicePrincipalName",
        "password": "myServicePrincipalPassword",
        "tenant": "myTentantId"
      }
Make a note of the above and keep them handy as you will need them later for configuring the asp credential in the Managing credentials within Jenkins section documented below
Create the Azure Container Registry
Azure Container Registry is a private registry service for building, storing, and managing container images and related artifacts. In this quickstart, we shall create an Azure container registry instance with the Azure portal. Then, use Docker commands to push a container image into the registry, and finally pull and run the image from the same registry.
Sign in to the Azure portal and create a container registry
Select Create a resource > Containers > Container Registry.
Create a new resource group with the name and location of your preference and provide a unique container registry name within Azure.
Accept default values for the remaining settings. Then select Review + create. After reviewing the settings, select Create.
Review the resource as below
Make a note of the following information from the Access keys section of your Azure Container Registry and keep them handy as you will need them later for configuring the acr credential in the Managing credentials within Jenkins section documented below.
Create a Web App for Containers in Azure
Azure App Service Web Apps lets you quickly build, deploy, and scale enterprise-grade web, mobile, and API apps running on any platform. Meet rigorous performance, scalability, security and compliance requirements while using a fully managed platform to perform infrastructure maintenance.
Let us now create ourselves a Web App for Containers.
Sign in to the Azure portal and create a Web App for Containers.
Select Create a resource > Web App for Containers.
Give your web app a unique App Name within Azure.
Accept default values for the remaining settings. Then select Review + create. After reviewing the settings, select Create.
Once the Web App is created, you may review the settings as shown below.
You may now test your default Web App by clicking on Browse to confirm that the Web App was deployed successfully.
Configure Jenkins to manage your Credentials
Let us now create our credentials and secrets within Jenkins. This will allow the Jenkins Pipeline jobs to connect into our Azure Account and work with Azure resources like Web App and Azure Container Registry.
From the Jenkins Dashboard > Manage Jenkins > Credentials > System > Global credentials > Add credentials
Add an Azure service principal inside the Jenkins Credential Manager
The following steps show how to manage your Azure credential within Jenkins:
Within the Jenkins dashboard, select Credentials -> System ->.
Select Global credentials(unrestricted).
Select Add Credentials to add a Microsoft Azure service principal. Make sure that the credential kind is Username with password and enter the following items:
Username: Service principal
appIdPassword: Service principal
passwordID: Credential identifier (such as
asp)
Below are the Azure Container Registry credentials acr (Username and Password)
Below are the credentials asp (Username and Password) for the Azure Service Principal that you have created initially
Below are the credentials (Secret Text) for the Azure Tenant ID
Ensure that your Azure VM has the NSG policy to allow inbound connections on the port that your application is listening on
Since my nodeJS application is listening on port 8080, you will need to open the VM Port accordingly
az vm open-port --resource-group jenkins267 --name jenkinsvm267 --port 8080 --priority 1010
Create your Jenkins pipeline (Manual Method)
Docker Build, Push and Run
This is the pipeline code that we will use for this tutorial. It is also uploaded as a github repo HERE
Note: You may use the sample pipeline as is and NO further changes are required in the pipeline
Note: If you plan to fork the above repository, you will need to modify the sample pipeline to reference the github repository to point to your github account
pipeline {
    agent any
    environment {
        AZURE_TENANT_ID = credentials('azure-tenant-id')
        ACR_REGISTRY = "acr267.azurecr.io"
        APP_REPO_NAME = "gsd"
    }

    stages {
        stage('git checkout') {
            steps {
              checkout([$class: 'GitSCM', branches: [[name: '*/main']], extensions: [], userRemoteConfigs: [[url: 'https://github.com/mfkhan267/jenkins_on_azure2024.git']]])
              sh 'pwd'
              sh 'ls -ltr'
              dir('app'){
                    sh 'pwd'
                        }
                    }
                              }
        stage('build docker image'){
            steps{
                dir('app'){
                    sh 'pwd'
                    sh 'sed -i "s/WebApp/WebApp v${BUILD_NUMBER}/g" app.js'
                    sh 'docker build --force-rm -t ${ACR_REGISTRY}/${APP_REPO_NAME}:${BUILD_NUMBER} .'
                    sh 'docker image ls'
                        }
            }
        }
        stage('push image'){
            steps{
                withCredentials([usernamePassword(credentialsId: 'acr', passwordVariable: 'password', usernameVariable: 'username')]) {
                sh 'echo Pushing Image ${ACR_REGISTRY}/${APP_REPO_NAME}:${BUILD_NUMBER} to the ACR'
                sh 'echo ${password} | docker login ${ACR_REGISTRY} --username ${username} --password-stdin'
                sh 'docker push ${ACR_REGISTRY}/${APP_REPO_NAME}:${BUILD_NUMBER}'
                }
            }
        }
        stage('Install Azure CLI'){
            steps{
                sh '''
                echo 'Installing Azure CLI'
                cat /etc/os-release
                hostname
                hostnamectl
                sudo apt-get update
                curl -sL https://aka.ms/InstallAzureCLIDeb | sudo bash
                az --version
                '''
            }
        }
        stage('deploy web app'){
            steps{
                withCredentials([usernamePassword(credentialsId: 'asp', passwordVariable: 'password', usernameVariable: 'username')]) {
                sh 'az login --service-principal -u ${username} -p ${password} --tenant ${AZURE_TENANT_ID}'
                }
                withCredentials([usernamePassword(credentialsId: 'acr', passwordVariable: 'password', usernameVariable: 'username')]) {
                //sh 'az webapp config container set --name my-container-app267 --resource-group jenkinsRG --docker-custom-image-name "$ACR_REGISTRY/$APP_REPO_NAME:$BUILD_NUMBER" --docker-registry-server-url https://"$ACR_REGISTRY" --docker-registry-server-user ${username} --docker-registry-server-password ${password}'
                sh 'az webapp config container set --name tetris-webapp267 --resource-group jenkins267 --docker-custom-image-name ${ACR_REGISTRY}/${APP_REPO_NAME}:${BUILD_NUMBER} --docker-registry-server-url https://${ACR_REGISTRY} --docker-registry-server-user ${username} --docker-registry-server-password ${password}'
                // sh 'az webapp config container set --name tetris-webapp267 --resource-group jenkins267 --docker-custom-image-name nginx:latest'
                // sh 'az webapp config container set --name tetris-webapp267 --resource-group jenkins267 --docker-custom-image-name mfk267/catcontainer:latest'
                // sh 'az webapp config container set --name tetris-webapp267 --resource-group jenkins267 --docker-custom-image-name mfk267/gsd:latest'
                }
                sh 'echo Successfully updated the tetris-webapp267 container app with the image version ${BUILD_NUMBER}'
            }
        }
    }
    post {
        always {
            echo 'Deleting all local images'
            sh 'docker image prune -af'
            sh 'docker logout'
            sh 'az logout'
        }
    }
}
Go to Jenkins >> Dashboard >> New Item >> Enter Job Name >> Select Pipeline >> Click OK
Paste the pipeline code into the Pipeline script box as shown below and click Save
Deploy the new image build to your Azure Web App
On the Jenkins Pipeline Job page >> Click Build Now
Wait until the Jenkins Pipeline build job is over. A graphic below the Build History heading indicates that the job is being executed or completed. Go to the job build and console output to see the results.
Congratulations! You have successfully Deployed your containerized app to your Azure Web App. Your Azure Web App should now be running your newly generated docker image with your App Code.